


In this guide
Explore the steps and reference sections below.
On this page
Registration Form: standalone feature deprecated. Email Verification and Registration Form are now combined in Registration & Access. The functionality remains available; its settings now live in one workspace. This page is retained for earlier versions. Open the current Registration & Access guide.
Overview
The Registration Form feature in Swift Commerce allows you to fully customize WordPress and WooCommerce registration forms with custom fields, validation rules, and display options. Instead of using multiple plugins for form customization, you get one unified solution.
Getting Started
- Navigate to Swift Commerce in your WordPress admin menu
- Click on Registration Form in the features list
- Toggle the Enable switch to activate the feature
- Configure your fields and settings
- Click Save Changes
Feature Tabs
Field Editor Tab
The Field Editor is a drag-and-drop interface for managing registration form fields.
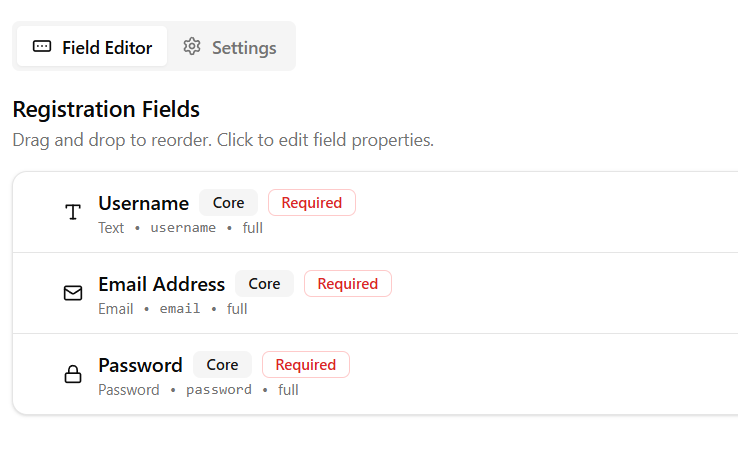
Core Fields (Built-in)
These fields are pre-configured and cannot be deleted:
| Field | Description | Notes |
|---|---|---|
| Username | User’s login name | Required, minimum 3 characters |
| Email Address | User’s email | Required, validated for format |
| First Name | User’s first name | Optional by default |
| Last Name | User’s last name | Optional by default |
| Password | User’s password | Handled by Email Verification feature when enabled |
Adding Custom Fields
- Click the + Add Field button
- Choose a field type from the dialog:
Text Fields:
- Text Input
- Password
- Phone Number
- URL
- Number
Selection Fields:
- Dropdown Select
- Multi-Select
- Radio Buttons
- Checkboxes
- Single Checkbox
Date Fields:
- Date Picker
- Date & Time
Advanced Fields (Pro):
- File Upload
- Hidden Field
- Heading
- Paragraph
- Divider
- Configure the field properties:
- Label – Display text above the field
- Placeholder – Hint text inside the field
- Description – Help text below the field
- Width – Full width or half width
- Required – Whether the field must be filled
- Validation – Min/max length, pattern, etc.
Managing Fields
- Drag to reorder – Click and hold the grip icon to rearrange fields
- Edit – Click the pencil icon to modify field properties
- Duplicate – Click the copy icon to create a copy of the field
- Toggle – Use the switch to enable/disable a field
- Delete – Click the trash icon to remove a custom field (core fields cannot be deleted)
Field Visibility (showOn)
Control where each field appears:
- WordPress – Standard /wp-login.php?action=register form
- WooCommerce – My Account registration form (Pro)
- Checkout – During checkout registration (Pro)
- My Account – Account details edit page (Pro)
Settings Tab
Form Context
Choose where your custom registration form applies:
| Setting | Free | Pro | Description |
|---|---|---|---|
| WordPress Registration | ✅ | ✅ | Standard WP registration at /wp-login.php?action=register |
| WooCommerce My Account | ❌ | ✅ | Registration on WooCommerce My Account page |
| Checkout Registration | ❌ | ✅ | Fields during guest checkout with account creation |
| My Account Edit | ❌ | ✅ | Allow users to edit custom fields in their account |
Display Settings
Customize how the form looks:
| Setting | Options | Description |
|---|---|---|
| Show Labels | On/Off | Display field labels |
| Show Placeholders | On/Off | Display placeholder text |
| Show Descriptions | On/Off | Display help text |
| Required Indicator | * / (required) / custom | Symbol for required fields |
| Indicator Position | Before / After label | Where the indicator appears |
Layout Settings
| Setting | Options | Description |
|---|---|---|
| Layout Style | Stacked / Inline | Vertical or horizontal arrangement |
| Columns Count | 1 / 2 | Multi-column layout |
| Field Spacing | Compact / Normal / Relaxed | Space between fields |
| Label Position | Above / Beside | Label placement relative to input |
Pro Features
With Swift Commerce Pro, you unlock additional capabilities:
WooCommerce Integration
- My Account Registration – Custom fields on the WooCommerce My Account registration form
- Checkout Registration – Add fields when customers create an account during checkout
- Account Edit – Let customers edit custom field values in My Account
Behavior Settings
| Setting | Description |
|---|---|
| Redirect After Registration | Choose where users go after registering (default, My Account, custom page, custom URL) |
| Auto-Login | Automatically log users in after registration |
| Send Welcome Email | Send a customized welcome email to new registrants |
File Uploads
Allow users to upload files during registration:
- Profile pictures
- ID documents
- Business licenses
- Any file type you specify
Settings:
- Maximum file size (MB)
- Allowed file types (jpg, png, pdf, etc.)
Field Types Reference
Text Fields
| Type | Icon | Use Case |
|---|---|---|
| Text | Aa | Names, company, custom text |
| ✉ | Email addresses with validation | |
| Password | 🔒 | Secure password input |
| Phone | 📞 | Phone numbers |
| URL | 🔗 | Website addresses |
| Number | # | Numeric values |
Selection Fields
| Type | Icon | Use Case |
|---|---|---|
| Dropdown | ▼ | Single selection from list |
| Multi-Select | ☑☑ | Multiple selections from list |
| Radio | ◉ | Single choice, all options visible |
| Checkboxes | ☑ | Multiple choices, all visible |
| Single Checkbox | ✓ | Terms acceptance, newsletter opt-in |
Date Fields
| Type | Use Case |
|---|---|
| Date Picker | Birthdate, start dates |
| Date & Time | Appointments, events |
Advanced Fields (Pro)
| Type | Use Case |
|---|---|
| File Upload | Documents, images |
| Hidden | Store hidden values |
| Heading | Section titles |
| Paragraph | Informational text |
| Divider | Visual separation |
Validation Options
Each field supports these validation rules:
| Rule | Description | Example |
|---|---|---|
| Required | Field must be filled | ✓ |
| Min Length | Minimum characters | 3 |
| Max Length | Maximum characters | 50 |
| Pattern | Regex pattern | ^[A-Z]{2}[0-9]{6}$ |
| Min Value | Minimum number (for number fields) | 18 |
| Max Value | Maximum number | 120 |
Integration with Email Verification
When the Email Verification feature is enabled:
- Password fields are automatically handled by Email Verification
- Users set their own password during registration
- Core password fields are skipped in Registration Form to prevent duplication
- Verification email is sent after registration
This ensures a seamless experience without duplicate password fields.
Emails tab
The current dashboard includes an Emails tab. Turn Welcome Email on or off there. It is sent after successful registration. Pro adds Customize Email, which opens the shared email editor for subject, heading, body, preheader, additional content, branding preview, and a test send. Keep useful placeholders such as {{user_name}}, {{user_login}}, {{site_name}}, and {{login_link}} in the message where relevant. Save the email editor and the feature settings, then test a registration.
More Settings controls
CAPTCHA Protection lets you require the Swift Commerce CAPTCHA feature on the registration forms you configure. Set up and test the CAPTCHA provider separately before turning this on. Role Assignment (Pro) assigns a default role and can apply field-based rules to assign a role when a selected field, condition, and value match. These rules affect account permissions: use only roles appropriate for public sign-up, and test a new account after changes.
Display Settings choose where the form appears; Layout Settings control the form layout, columns, spacing, and label position; Behavior Settings control the post-registration destination. Verify each enabled WordPress and WooCommerce surface rather than assuming one setting applies to every form.
Final checks
- Register on each enabled surface and confirm field order, required-field validation, account role, welcome email, and redirect.
- If Email Verification is also enabled for the same surface, choose which feature controls fields in Email Verification → Settings. Test the password and verification/approval flow together.
- For file-upload fields, verify allowed file types, size limits, and the resulting account data before making the form public.